How To Show And Hide A Date Picker From A Table View Cell


If your app needs a date and/or time to be chosen, sometimes it is best not to have the user segue to a different View in order to accomplish this. This tutorial will demonstrate how to show and hide a Date Picker contained in a Table View Cell.
By Freddy Montas
*This tutorial was made with Xcode 7.2.1 and Swift 2 for iOS 9*
Go ahead and download this starter project, which already has a Table View Controller added to Main.storyboard as well as a UITableViewController class associated.
As you can see the Table View content has been changed to Static Cells and the Table View Controller has only one section with two Rows. On the second row a Date Picker has been added and the Table View Cell from this row has a row height of 218 in order to fit the Date Picker accordingly. Additionally, View controller-based status bar appearance was added to Info.plist and set to NO. The Hide Status Bar is checked on the General settings of the app. Also, two labels have been added to the first Table View Cell. The Table View Controller is set as Initial View Controller. Finally, the project is set to run on iPhone with the device orientation portrait. The size class used is w:Compact h:Regular.
Now, let’s get started!
On the Main storyboard, select the Date Picker and head over to the Attributes Inspector. Change the Mode to Date. Leave the other settings in default like this screen below:

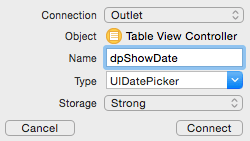
Connect the Date Picker to the TableViewController.swift file as an outlet and set its name to dpShowDate:
Connect the Date Picker to the TableViewController.swift file as an action, type as UIDatePicker and set the name to dpShowDateAction:

Now, we will work specifically with the TableViewController.swift file. The first thing you’ll notice is that I have added the following line on viewDidLoad:
self.tableView.backgroundColor = UIColor.lightGrayColor()
This is simply done to have a better visual of the Date Picker being shown and hidden.
Declare the following global variable on the TableViewController.swift file:
private var dpShowDateVisible = false
This variable will be used to determine whether the Date Picker should be visible or not.
Add the following function:
private func toggleShowDateDatepicker () {
     dpShowDateVisible = !dpShowDateVisible

     tableView.beginUpdates()
     tableView.endUpdates()
}
This function does two things: 1) Negates the existing value of the bool dpShowDateVisible and 2) updates the TableView. TableView should always be updated each time the bool dpShowDateVisible is changed in order to show or hide the Date Picker.
Add the method didSelectRowAtIndexPath to trigger the previous function added:
override func tableView(tableView: UITableView, didSelectRowAtIndexPath indexPath: NSIndexPath) {
     if indexPath.row == 0 {
          toggleShowDateDatepicker()
     }

     tableView.deselectRowAtIndexPath(indexPath, animated: true)
}
This method calls the function toggleShowDateDatepicker() every time the first row of the Table View is pressed.
Add the method heightForRowAtIndexPath to change the height of a cell:
override func tableView(tableView: UITableView, heightForRowAtIndexPath indexPath: NSIndexPath) -> CGFloat {
     if !dpShowDateVisible && indexPath.row == 1 {
          return 0
     } else {
          return super.tableView(tableView, heightForRowAtIndexPath: indexPath)
     }
}
This method goes through every row of the Table View Controller to set its height. Whenever it reaches row 1 (the Table View Cell where the Date Picker is located) and dpShowDateVisible is false, it will hide this Table View Cell by setting its height equal to 0. If these two conditions are not met then the method will return the normal height of the Table View Cell.
If you build and run the app now you will get the following result:

Not to worry ☺. This is simply because we haven’t updated the TableViewController.swift file with the number of sections and rows it should have. Right now, both are set to 0. Go ahead and change sections to 1 and rows to 2 like this:
// MARK: - Table view data source

override func numberOfSectionsInTableView(tableView: UITableView) -> Int {
     return 1
}

override func tableView(tableView: UITableView, numberOfRowsInSection section: Int) -> Int {
     return 2
}
If you build and run it again, now it should work and you will get this result:

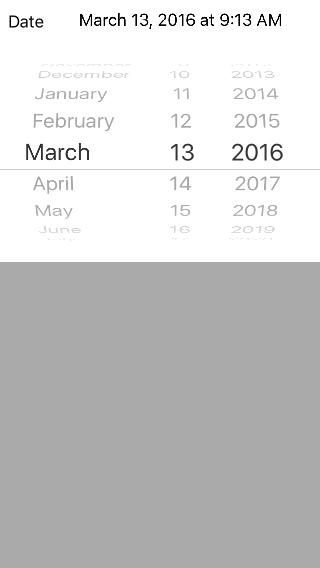
Once you press the first table view cell with label Date the Date Picker will appear like this:

Here you can see that the first row or Table View Cell with label Date is selected. Since every time it is pressed the function toggleShowDateDatepicker() is called, here you can see the Date Picker being shown and hidden.
You can download the complete solution here.
Bonus 1: Show date selected on label
Connect the label to the right as an outlet to the TableViewController.swift file:

Add the following function to the swift file:
private func dpShowDateChanged () {
     lblShowDate.text = NSDateFormatter.localizedStringFromDate(dpShowDate.date, dateStyle: NSDateFormatterStyle.LongStyle, timeStyle: NSDateFormatterStyle.NoStyle)
}
This function will set the text for label lblShowDate to the value selected from the dpShowDate Date Picker.
Earlier we added an Action connection from the Date Picker to the TableViewController.swift file. Now we’re going to use it. Call the function dpShowDateChanged inside this action like this:
@IBAction private func dpShowDateAction(sender: UIDatePicker) {
     dpShowDateChanged()
}
Run the app again and when you select a date from the Date Picker it will be displayed on the label to the right. Download this solution here.
Play around with the NSDateFormatterStyle for the date and see the different results. You can also play around with the NSDateFormatterStyle for the time. Just know that select NSDateFormatterStyle.ShortStyle for the timeStyle, the date and time will be displayed on the label like this:
To be able to select both date and time from the Date Picker, change the Mode to Date and Time on the Attributed Inspector of the Date Picker on the Main.storyboard. Once you do the Date Picker will look like this:

Bonus 2: didSelectRowAtIndexPath Method
We already saw how to validate whenever a specific row has been pressed. If by any chance you have more than one section, you could also validate which row from a specific section has been pressed like this:
override func tableView(tableView: UITableView, didSelectRowAtIndexPath indexPath: NSIndexPath) {
     if indexPath.section == 0 && indexPath.row == 0 {
          toggleShowDateDatepicker()
     }
}
Bonus 3: heightForRowAtIndexPath Method
If you decide to add more sections, then you will also need to validate which section to hide and show, like this:
override func tableView(tableView: UITableView, heightForRowAtIndexPath indexPath: NSIndexPath) -> CGFloat {
     if !dpShowDateVisible && indexPath.section == 0 &&  indexPath.row == 1 {
          return 0
     } else {
          return super.tableView(tableView, heightForRowAtIndexPath: indexPath)
     }

}
Bonus 4: Show date when first Table View Cell is selected
If you would like to display the date as soon as the first Table View Cell is selected just add dpShowDateChanged() function to the didSelectRowAtIndexPath method when the row is selected like this:
override func tableView(tableView: UITableView, didSelectRowAtIndexPath indexPath: NSIndexPath) {
     if  indexPath.row == 0 {
          toggleShowDateDatepicker()
          dpShowDateChanged()
    }
}
This way the user will not have to select a date from the Date Picker in order for it to be shown on the label.
[thrive_text_block color=”blue” headline=”About the guest author”]

Freddy Montas is a Computer Science Engineer from the Dominican Republic with a Masters degree in business. He has a diverse background on IT including software development in .NET, networking and home automation. Since the announcement of Swift, he has picked up app development for iOS. Having published his first app last year, Awesome Motivational Quotes (AMOQ). He has been a teacher at a local University (PUCMM) in his country for 6 years, having taught networking, programming and Telecommunication Standards (GSM, GPRS, UMTS, CDMA2000, WiMAX, and LTE) for the Telecommunications Engineer Bachelor’s Degree.
You can view his LinkedIn profile here.
You can view his Twitter profile here.[/thrive_text_block]
References
Title Image: @ xtock / shutterstock.com