Passing Data Between View Controllers


Passing data between view controllers is a very common task. Depending on the circumstances, there are several ways to accomplish this.
Hint: This post is using Swift 3, iOS 10 and Xcode 8.2.1
Generally speaking, there are two cases: Passing data to the next view controller, or passing data to the previous view controller. We will look at both of them.
The post is also covered in this video:
Example project
We start by creating a small example project. We have two view controllers. View controller A looks like this:

It has a text field and a button ‘Show B’. After tapping this button, view controller B will be pushed onto the navigation controller stack:
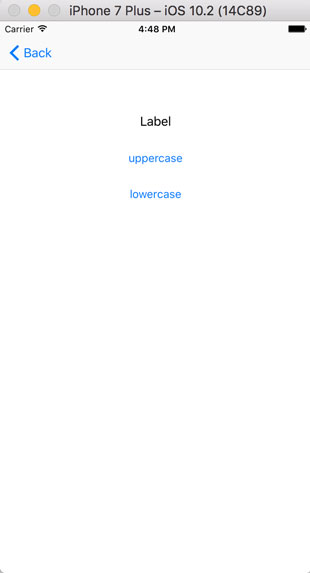
This view controller has a label and two buttons. After tapping the ‘uppercase’ button, the text of the label will be uppercased, and after tapping the ‘lowercase’ button, the text of the label will be lowercased. There is no connection between these view controllers though.
We want to achieve the following behaviour:
- Before pushing view controller B, the content of the text field should be passed to view controller B. Then the text should be displayed by the label.
- After every change of the text inside the label of view controller B, the new text should be passed back to view controller A and be displayed inside the text field.
These are good examples for passing data to the next view controller (case 1) and passing data to the previous view controller (case 2).
For this example, we are using a storyboard.
Passing data to the next view controller
This is relatively easy: Generally speaking, a view controller knows what’s the next view controller – otherwise it wouldn’t be possible to present it. Since this holds true, view controller A can access view controller B directly and set a property. For that, we first create a property inside of view controller B and set the text after the view has been loaded:
import UIKit

class ViewControllerB: UIViewController {

    @IBOutlet weak var label: UILabel!

    var text: String? = nil

    override func viewDidLoad() {
        super.viewDidLoad()

        label.text = text
    }

    @IBAction func uppercasePressed(_ sender: Any) {
        label?.text = label?.text?.uppercased()
    }


    @IBAction func lowercasePressed(_ sender: Any) {
        label?.text = label?.text?.lowercased()
    }

}
Now, view controller A can set this property before the next view controller gets presented:
import UIKit

class ViewControllerA: UIViewController {

    @IBOutlet weak var textField: UITextField!

    override func prepare(for segue: UIStoryboardSegue, sender: Any?) {
        if let viewControllerB = segue.destination as? ViewControllerB {
            viewControllerB.text = textField.text
        }
    }

}
Note that it would also be possible to create an init method for the second view controller in order to make it more clear which properties should be set. You aren’t always creating view controllers manually though, for example when you are using a storyboard.
Passing data to the previous view controller
This situation is a little bit different. The second view controller neither have to know how it has been displayed nor by whom. It even shouldn’t know it! Just imagine you decide later on to present the same view controller in another context of the app. Then it would be great, if the view controller doesn’t depend on the previous view controller – that’s good software architecture.
So the second view controller should work even if it doesn’t know the previous view controller. We accomplish this by using protocols. The second view controller defines a protocol, and the first view controller have to confirm to this protocol. Then, the first view controller is also called the delegate of the second view controller.
So let’s start by modifying view controller B. We insert a protocol, a property for the delegate, and inform this delegate whenever the text has been changed:
import UIKit

protocol ViewControllerBDelegate: class {

    func textChanged(text:String?)

}

class ViewControllerB: UIViewController {

    weak var delegate: ViewControllerBDelegate?

    @IBOutlet weak var label: UILabel!

    var text: String? = nil

    override func viewDidLoad() {
        super.viewDidLoad()

        label.text = text
    }

    @IBAction func uppercasePressed(_ sender: Any) {
        label?.text = label?.text?.uppercased()
        delegate?.textChanged(text: label?.text)
    }


    @IBAction func lowercasePressed(_ sender: Any) {
        label?.text = label?.text?.lowercased()
        delegate?.textChanged(text: label?.text)
    }

}
Now we can modify view controller A. We let it confirm to the protocol, insert the delegate method and set it as view controller B’s delegate:
import UIKit

class ViewControllerA: UIViewController, ViewControllerBDelegate {

    @IBOutlet weak var textField: UITextField!

    override func prepare(for segue: UIStoryboardSegue, sender: Any?) {
        if let viewControllerB = segue.destination as? ViewControllerB {
            viewControllerB.text = textField.text
            viewControllerB.delegate = self
        }
    }

    func textChanged(text: String?) {
        textField.text = text
    }

}
Note that the delegate property has to be weak. If it isn’t, a so-called retain cycle could be created. This will lead to an increased memory usage of your app and could potentially be the reason why the operating system kills your app. For more details about retain cycles, take a look at this post: Retain Cycles, Weak and Unowned in Swift.
Other possibilities
Of course these are not the only ways for passing data between view controllers. If the data should be persisted permanently, it can be saved for example to a database. Then, every view controller can access the data it needs through the database.
References
Title Image: @ Novelo / shutterstock.com